Performer.in
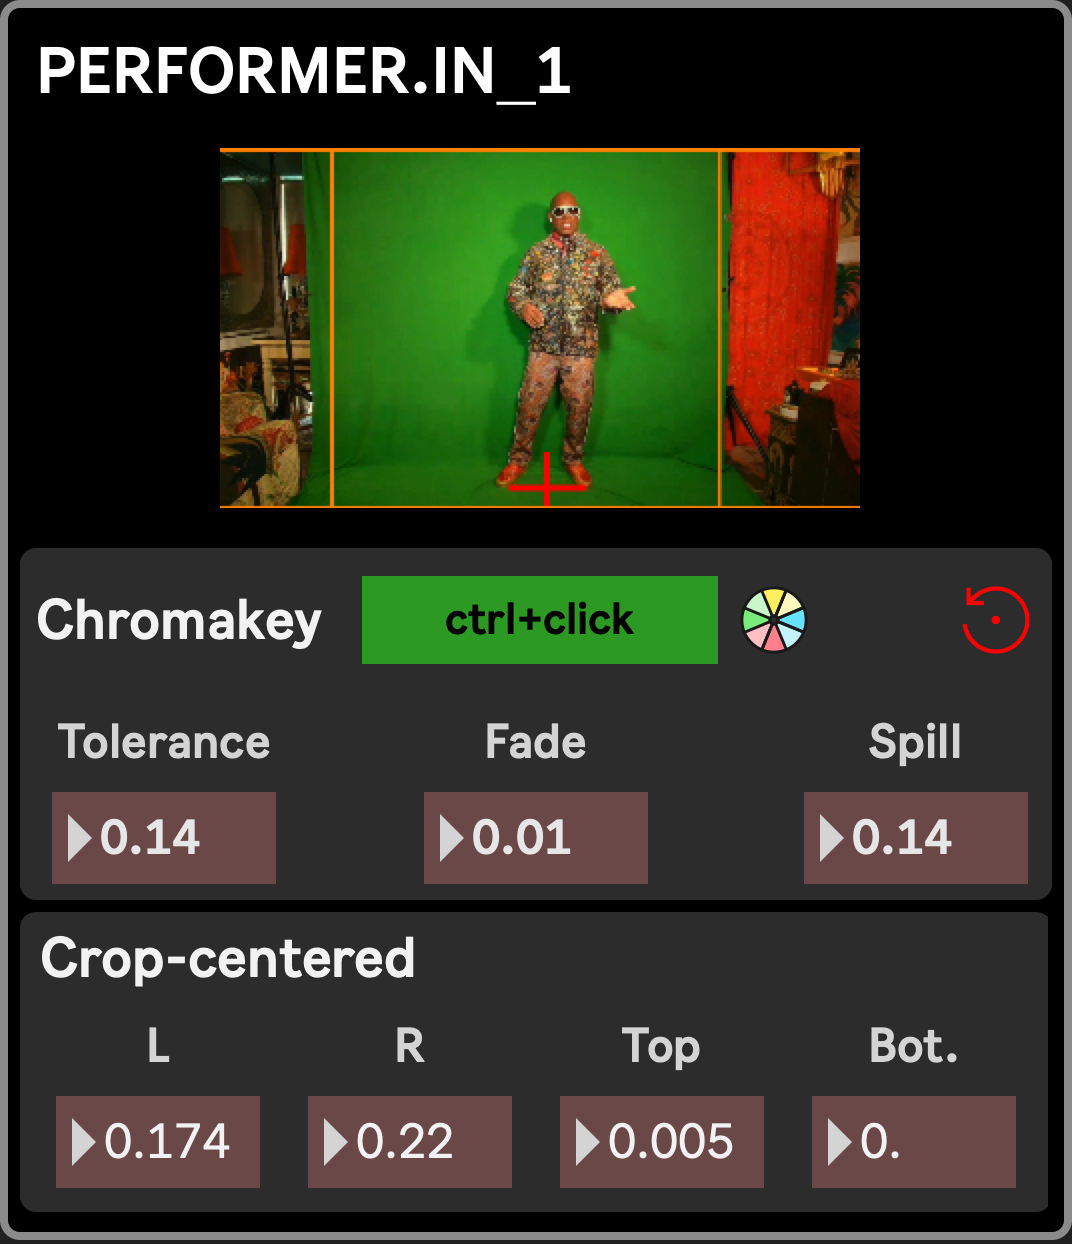
The goal of the Performer input modules is to prepare a video feed (typically a live source coming from an External Source module, or a video placeholder coming from a Media player) before sending it as a clean, cut-out texture for the Performers on Stage. It can remove the background of the incoming feed (chromakeying), crop it to the usable area (the texture gets downsized to the croped section), and set the performer’s anchor point.
Performer.in 1 to 4 can be thought as intermediary destination modules as they sit in-between source modules and Performer 1 to 4 respectively. They have the particularity of being visible only from the Setup layout, and their parameters are stored in Setup presets.
How to use
Section titled “How to use”The Performer input module is usually set the first time a (real) performer connects to the system. The values that will be set for this module will be very specific to the performer’s current setup (camera position, green screen lighting, costume…), and thus might need to be tweaked in case of changes. The following steps describe a typical workflow to set this module up:
-
Let’s assume we start from the Default project, which can serve as a template project with predefined presets allowing us to quickly test the result of our changes in a scene.
-
Let’s also assume you are comfortable enough to set a scene up (or use the premade presets) to be able to see the performer in the final output so that you can monitor the result of your tweaks.
-
Crop: Start by cropping the sides of the image so that only the green screen is visible in the background of the area delimited by orange lines.
-
Anchor point: set the anchor point (the point at which the virtual performer will be grounded to their platform) by a simple click on the image’s preview at the point of contact between the performer’s feet and the ground they stand on. It is represented as a red cross in the preview.
-
Chromakey: select the color to key out by holding CTRL and clicking the desired point in the image’s preview. The selected color will be shown below the preview. Then adjust the tolerance and fade until you get satisfied with the result in the final output. You might need to go back and forth several times between selecting a color and adjusting the tolerance and fade to get a better result. Once you are done with the keying, adjust the spill parameter to remove any possible tint of the green screen around the performer.
-
Once done, you can save the result in a new Setup preset.
Parameters and controls
Section titled “Parameters and controls”
- chromakey: used for background removal
- key: the target color to key out. It is selected by ctrl + clicking on the preview image and is displayed in the rectangle just below it. You can also open the system’s color picker by clicking on the color wheel icon and select the color from there.
- tolerance: sets the tolerance threshold between the defined key color and those found in the source image. Lower values will remove fewer pixels, higher values will remove more aggressively, possibly removing what you intend to keep
- fade: specifies the smoothness of the color removal. Lower values leave hard edges around removed pixels; higher values soften the edge of removed areas
- spill: specifies how aggressively to remove traces of the key color from the source around the edge of other colors (for example, green pixels around a subject’s hair)
- anchor_pos: the position of the anchor point of the performer, defining which point in the image is supposed to be the center of the ground. This is typically where the real performer’s feet land in the image, and is used in the background to make the (virtual 2D plane) performer grounded to their platform. Scaling the performer (using the Performer’s scale parameters) will also occur around the anchor point, which will remain the only visibly static point in the scene. However, rotation is not impacted by the anchor point and occurs around the center of the Performer plane.
- crop::(left|right|top|bottom): crops the incoming texture to remove its borders. Contrarily to other modules with crop parameters, cropping the texture here will effectively change its output dimension and aspect ratio, although this should be no concern for the average user as automatic adjustments are done in the background to account for these changes.