Performers and platforms
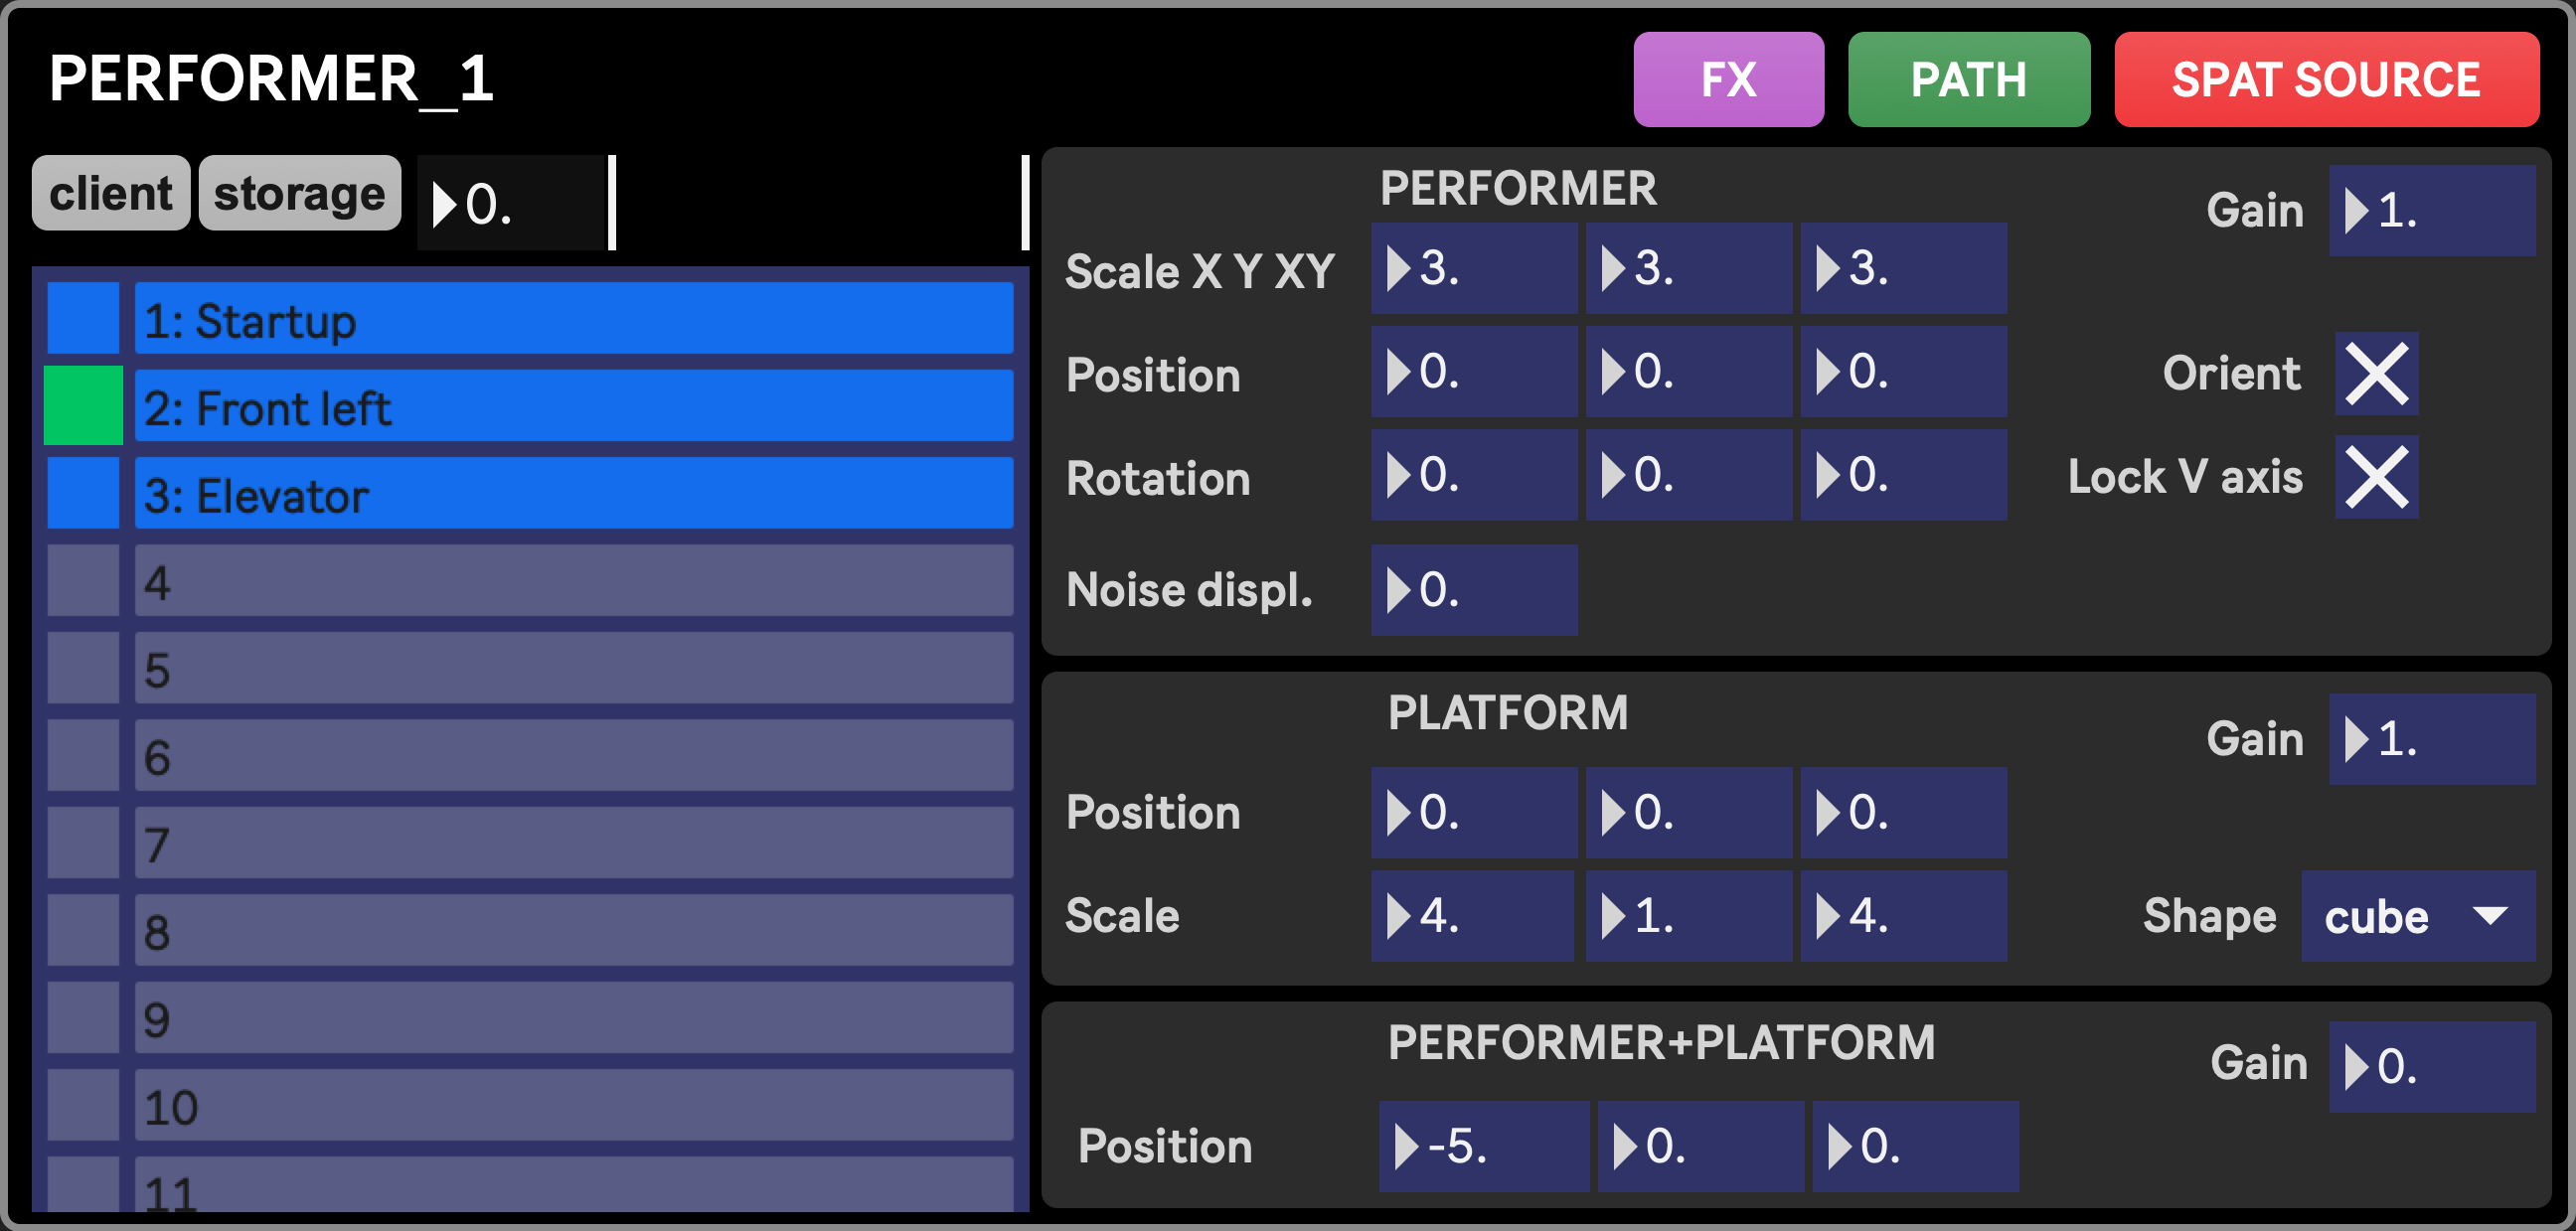
Performers and platforms work in tandem. Each performer has its own platform and both can be moved either independently or as a whole. There are four instances of this duo (shortly named performer_1 to performer_4), each with their own Performer presets, so that each of the four duos can be controlled individually through presets, as well as altogether through the Presets grid.
Each performer module, as seen in the Stage layout extends with three floating windows that can be opened with the FX, PATH, and SPAT SOURCE buttons located in the upper right screen.
- FX: Fx rack applied on the performer texture, before being rendered in the 3D stage
- Path: Path creator for controlling the ensemble (performer+platform) position
- Spat source: brings the Spat source window with all parameters for controlling this performers audio through Spat Revolution
Performer
Section titled “Performer”Technically, the performer is a 2D plane on which is drawn the texture emanating from the related performer.in module, itself processing the output of the routed source module set in the Modules settings: Source module > performer.in module > performer plane. That plane is, by default, always facing the camera, assuming the sense of depth will be given by the image’s texture, typically representing the real performer as filmed by their webcam.
-
Gain: makes the performer fully visible (1.0) or transparent (0.0). By default, this parameter is mapped to the fader of the Mixer track assignated to that performer.
-
Scale (performer_scale_x, performer_scale_y, performer_scale_xy): scales the performer plane horizontally (x), vertically (y), or both at the same time (xy). Scaling is centered around the anchor point (typically the point of contact between the real performer’s feet and the ground), as defined in the performer input module, which can be considered as the center of the scaling operation as it will remain static.
-
Position: X Y Z position of the performer plane in the world, added up to the ensemble (performer+platform) position
-
Rotation: X Y Z rotation of the performer plane in the world. This adds up to potential rotation caused by the Orient parameter described below
-
Orient: when enabled (by default), the performer plane automatically rotates to always face the camera, preventing it from viewing the performer plane from its (flat) side, which would break the illusion of depth. The rotation caused by Orient adds up to the Rotation parameters. So the plane will effectively face the camera only if Rotation is set to 0, 0, 0.
-
Lock V. axis: when enabled (by default), prevents the Orient feature from rotating the performer plane upward/downward, preserving its vertical orientation (assuming Rotation parameters are set to 0). It also helps preserving the illusion that the performer remains grounded to its platform, with the caveat that the plane will reveal its flatness as the camera go above/below the performer plane. With Orient and Lock V axis enabled, the performer plane acts like a 2D sprite in a 3D world, in typical video game fashion
-
noise-displace::scale: adds distortion based on the image generated by the Noise module. Here, that effect has the particularity of scaling the performers plane as the noise displacement increases. This gives the illusion that the performer gets spread and “dissolved” across the entire screen and not just in the limited frame of the performer plane.
-
FX Rack (opened from the FX button): apply effects to the performer texture before it gets painted onto the performers plane. See FX Rack for more info.
Platform
Section titled “Platform”
To further embed a performer into the scene, they are typically positioned on a 3D stage platform. This platform gives the illusion of groundedness and prevent the performer from appearing to float unrealistically within the space. Technically, the platform is a 3D shape (by default a scaled cube, or rectangular parallelepiped) on which can be applied a texture (set in the Modules settings, or a pbr material (hidden feature for now).
-
Gain: makes the platform fully visible (1.0) or transparent (0.0). By default, this parameter is mapped to the fader of the Mixer track assignated to that platform.
-
Scale: scale the platform volume along X, Y and Z axis
-
Position: X Y Z position of the platform in the world, added up to the ensemble (performer+platform) position
-
Rotation (accessible only from Macro assignments): X Y Z rotation of the platform in the world
-
Shape: 3D shape of the platform. Available shapes are sphere, torus, cylinder, opencylinder, cube, opencube, plane, circle, cone and capsule.
-
Roughness (accessible only from Macro assignments): controls how sharp or blurry reflections look on the surface. Low values gives a smooth polished, mirror-like surface, while high values give a more matte, chalky, diffused result. If a pbr material featuring a roughness_texture map is in use then roughness should be set to 1 for expected output.
-
Metalness (accessible only from Macro assignments): determines whether the surface behaves like a metal or a non-metal. At 0, the platform acts like plastic, stone, or fabric: light bounces off evenly and the surface keeps its own color. At 1, it behaves like real metal: the surface color mostly disappears and what you see is mostly reflections of the environment and lights, tinted by the material’s color. If a pbr material featuring a metallic_texture map is in use then metalness should be set to 1 for expected output.
-
Reflection (accessible only from Macro assignments): enables reflection from the skybox. Reflection is impacted by metalness and roughness.
Ensemble (Performer + Platform)
Section titled “Ensemble (Performer + Platform)”
Ensemble parameters are applied to both the performer and the platform, allowing to move them (position X Y Z) or fade them (gain) in tandem with just one control for each parameter, which becomes convenient when they are positioned manually using an external controller. The ensemble position can also be controlled through the 3D panner, or determined by a path. You can manage paths for this ensemble by clicking the Path Creator button, which will open Path Creator window for that ensemble.
-
Ensemble gain: controls both performer and platform gains at the same time
-
Ensemble position, moves both performer and platform as a group. The ensemble position gets added to the individual performer and platform positions to give their final, absolute world position. Ensemble position can be driven by a path, and is reflected in/can be controlled from the 3D panner.
Spat Source
Section titled “Spat Source”
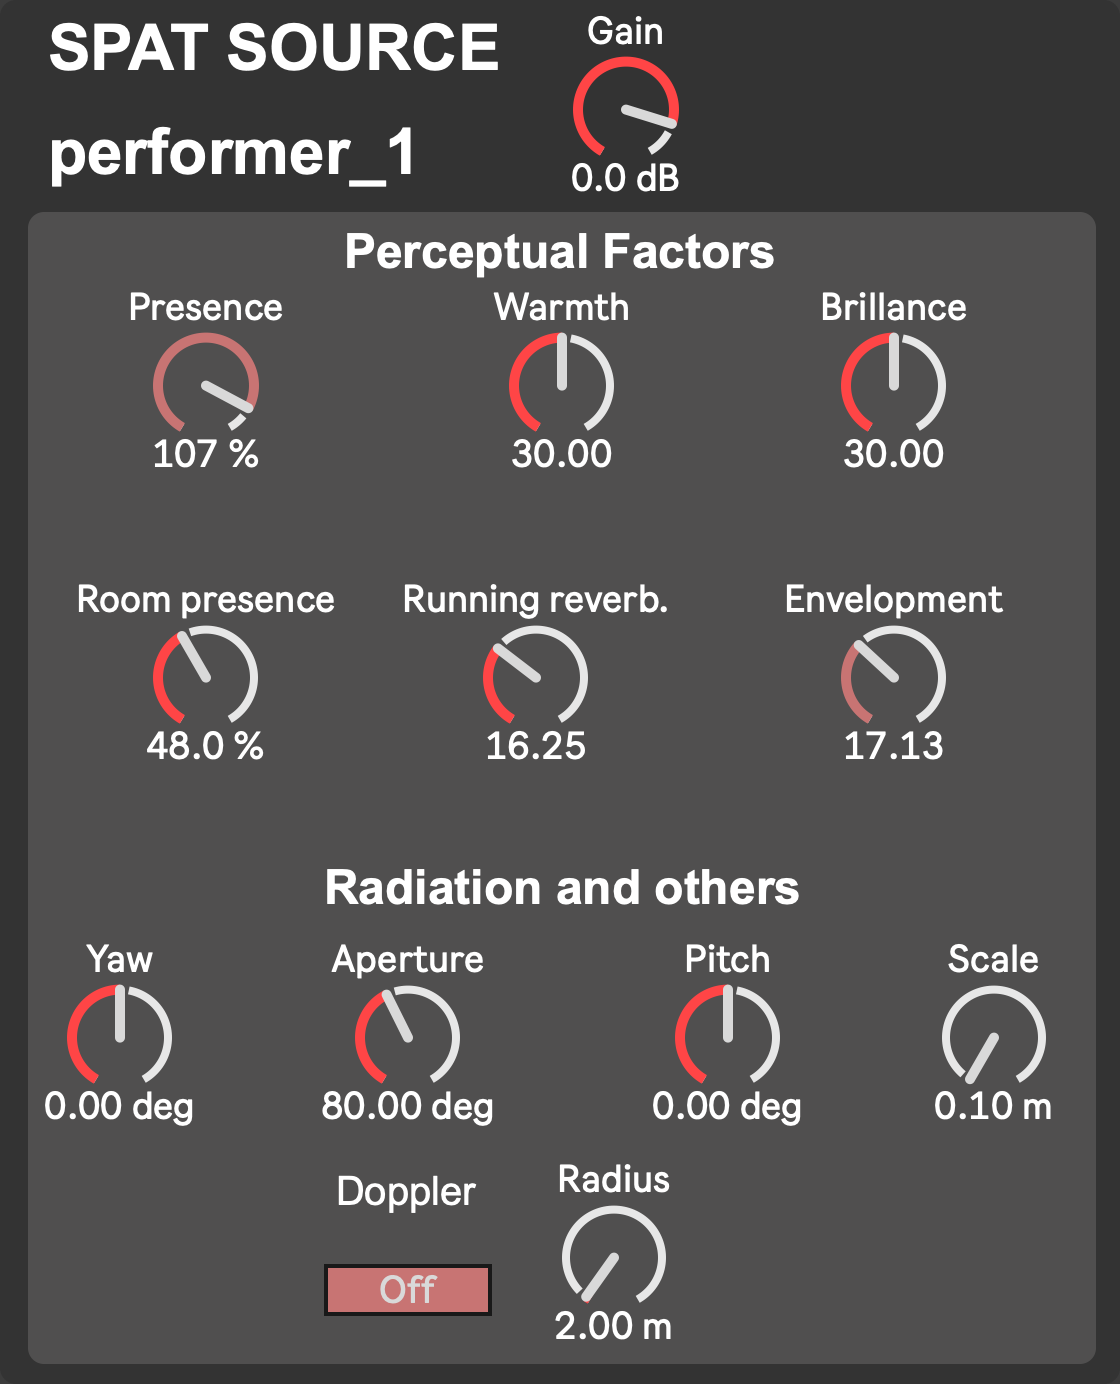
Spat source parameters, available by clicking the “Spat source” button in the upper right corner of the Performer module, are all Spat Revolution parameters specific to that performer. Just like the performer’s position and rotation, they are sent through OSC to the Spat source defined for that performer according to the Spat settings. Being part of the Performer presets, they can be updated in real time alongside other Performer parameters, allowing emphasis between audio and visuals.
Most parts of the following parameter descriptions come from the official Spat Revolution documentation:
- Gain: the source input gain
- Perceptual factors:
- Presence: the source’s presence refers to the prominence of the direct sound with respect to the reverberated sound. It is not just equivalent to a dry/wet ratio and is influenced by other settings such as distance, radius, and drop factor. This parameter cannot be set manually if the auto-presence feature of the Spat room module is enabled.
- Warmth: presence of the low-frequency content part of the source.
- Brilliance: Presence of the high-frequency content part of the source.
- Room presence: the prominence of the reverberation with respect to the source, or in other words, how much the room sound dominates the overall sound.
- Running reverberance: controls the amount of perceived reverb when feeding a continuous music message, where the overall sound is a tight blend of the dry and wet signals and the reverb part cannot be mentally separated. It is linked to the early reflections decay time of the SPAT Revolution Reverb engine.
- Envelopment: corresponds to the perceived notion of how much the listener feels that they are surrounded or immersed by the ambient sound. In a multichannel configuration, one could describe this as the feeling of being wrapped inside the imaginary “sound sphere” that the listener pictures in her mind. It can also be described as the energy of the early room effect with respect to direct sound. This parameter cannot be set manually if the auto-envelopment feature of the Spat room module is enabled.
- Radiation and others
- Yaw: the angle of the source direct orientation relative to the listener-source axis, in degrees
- Aperture: relates to the “sound cone” projected by the virtual source in the acoustic space and is measured in degrees. It determines whether the source will be very directive (small aperture), or omnidirectional (large aperture) inside the reverberant environment.
- Pitch: Source direct orientation pitch angle, in degrees. Think of pitch in the nautical sense of the word, how a boat pitches up and down in stormy seas.
- Scale: Scale the group cluster, maintaining their barycenter and relative relationships. Determines the distance between left and right channels of the source.
- Doppler: The Doppler effect is a well-known wave propagation phenomenon where the height of a sound perceived from a listener’s standpoint rises when the source is accelerating and falls when decelerating. This is the fire siren pitch going up and then down when passing you. It will only be heard if you quickly move the source locations quite fast, but thanks to the virtual nature of the SPAT, you can bypass Physics’ laws and manually inhibit it using this switch, should it be unsuitable for the particular application you are dealing with.
- Radius: Specifies the radius of a sphere or disc in meters, centered around the listener position, where the drop attenuation is not taken into account, and the sound level is kept constant regarding distance. This is not only useful to prevent any dramatic sound level peak when placing a source too close to the listener, but it also reflects real-world behavior quite accurately, where sources do have a certain physical size, unlike point sources that are commonly used to model far-field acoustics. This “no-drop” zone is displayed as a transparent sphere of matching radius in the Room graphics.