Path Creator
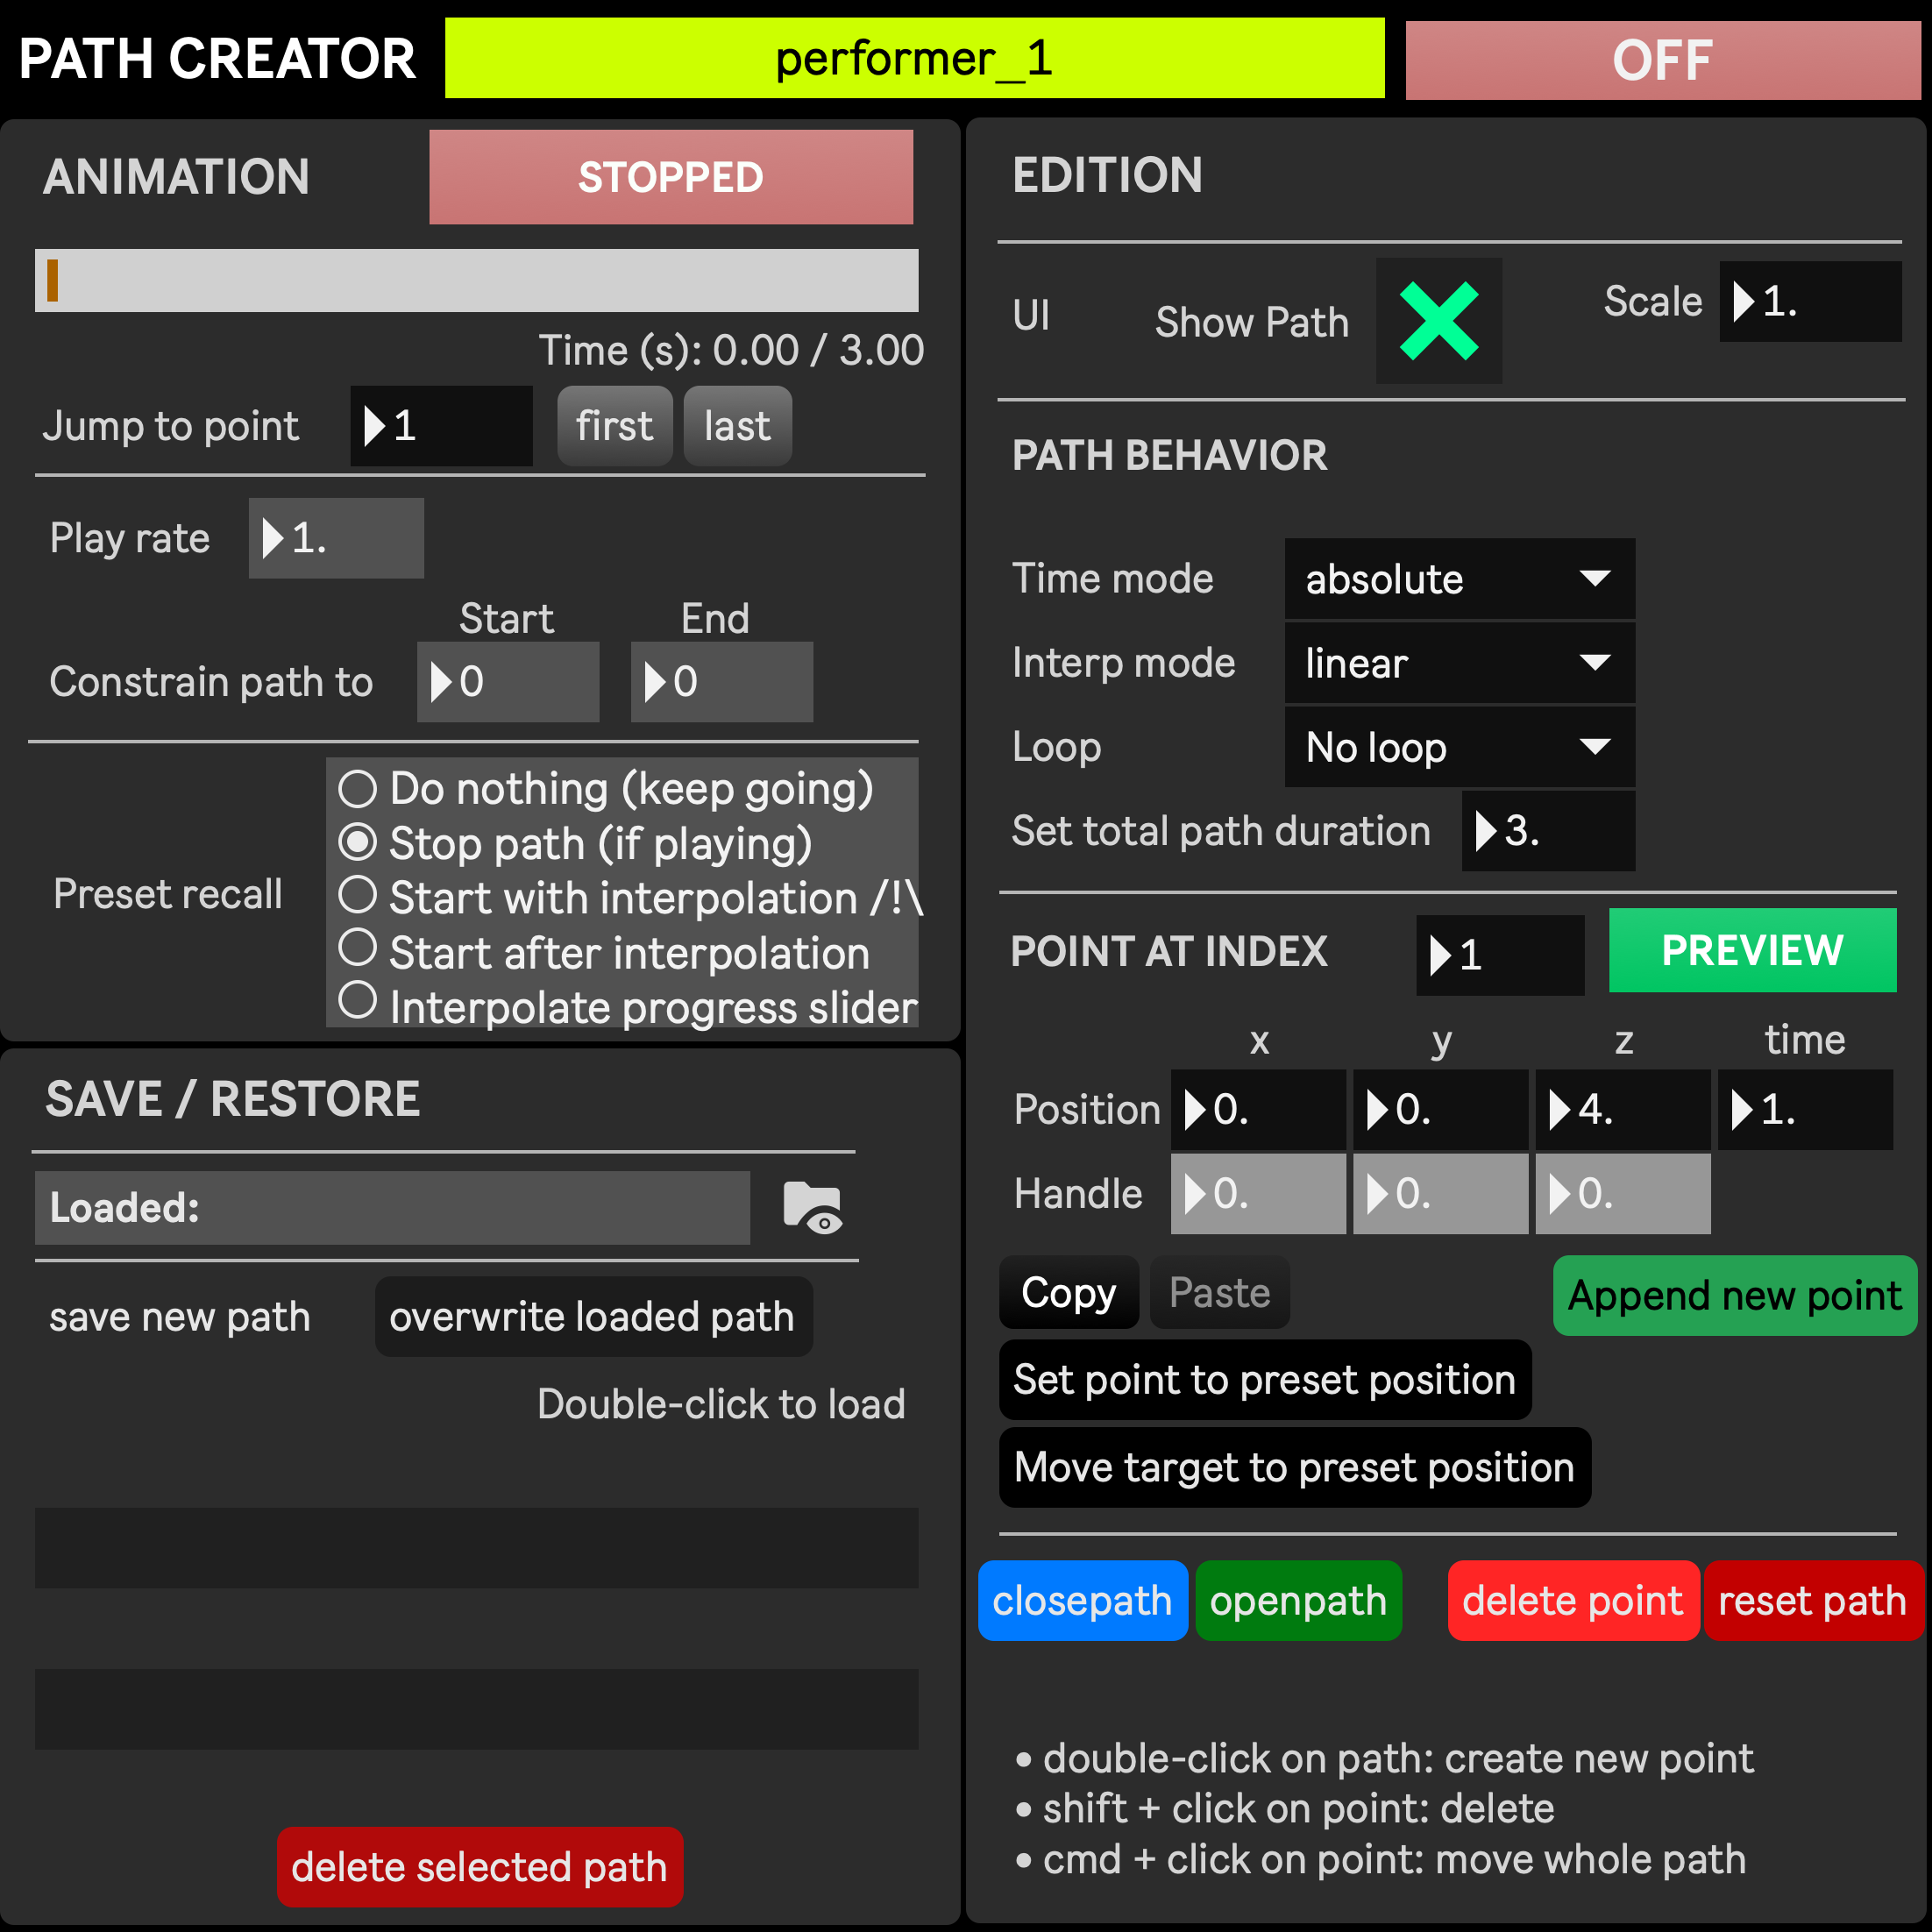
The Path Creator allows the user to create paths for Performer+Platform ensembles and the Camera to follow.
A path is a series of points in the 3D space, connected one by one either by straight lines or Bézier curves, defining a trajectory along which the attached object (the stage camera or a performer ensemble) can move.
Each performer ensemble as well as the camera can follow their own individual path simultaneously.
Paths are stored as special json files in the Project folder at `
The path creation process happens in two places: in the 3D Panner for visualizing paths and modifying them by dragging points with the mouse, and in the Path creator windows for managing all settings, saving the paths, and deciding how they interact with presets.
For the rest of this section we will use the term object to refer to anything that can be controlled by a path, i.e. a performer+platform ensemble or the Camera.
It is worth noting that as long as a path is playing, the recalling of the object position through presets is disabled, preventing conflicting positions being sent at the same time. This can be managed in multiple ways using the Preset recall modes in the Path Creator window. For additional tips, see Positioning and Moving strategies.
Paths in the 3D panner
Section titled “Paths in the 3D panner”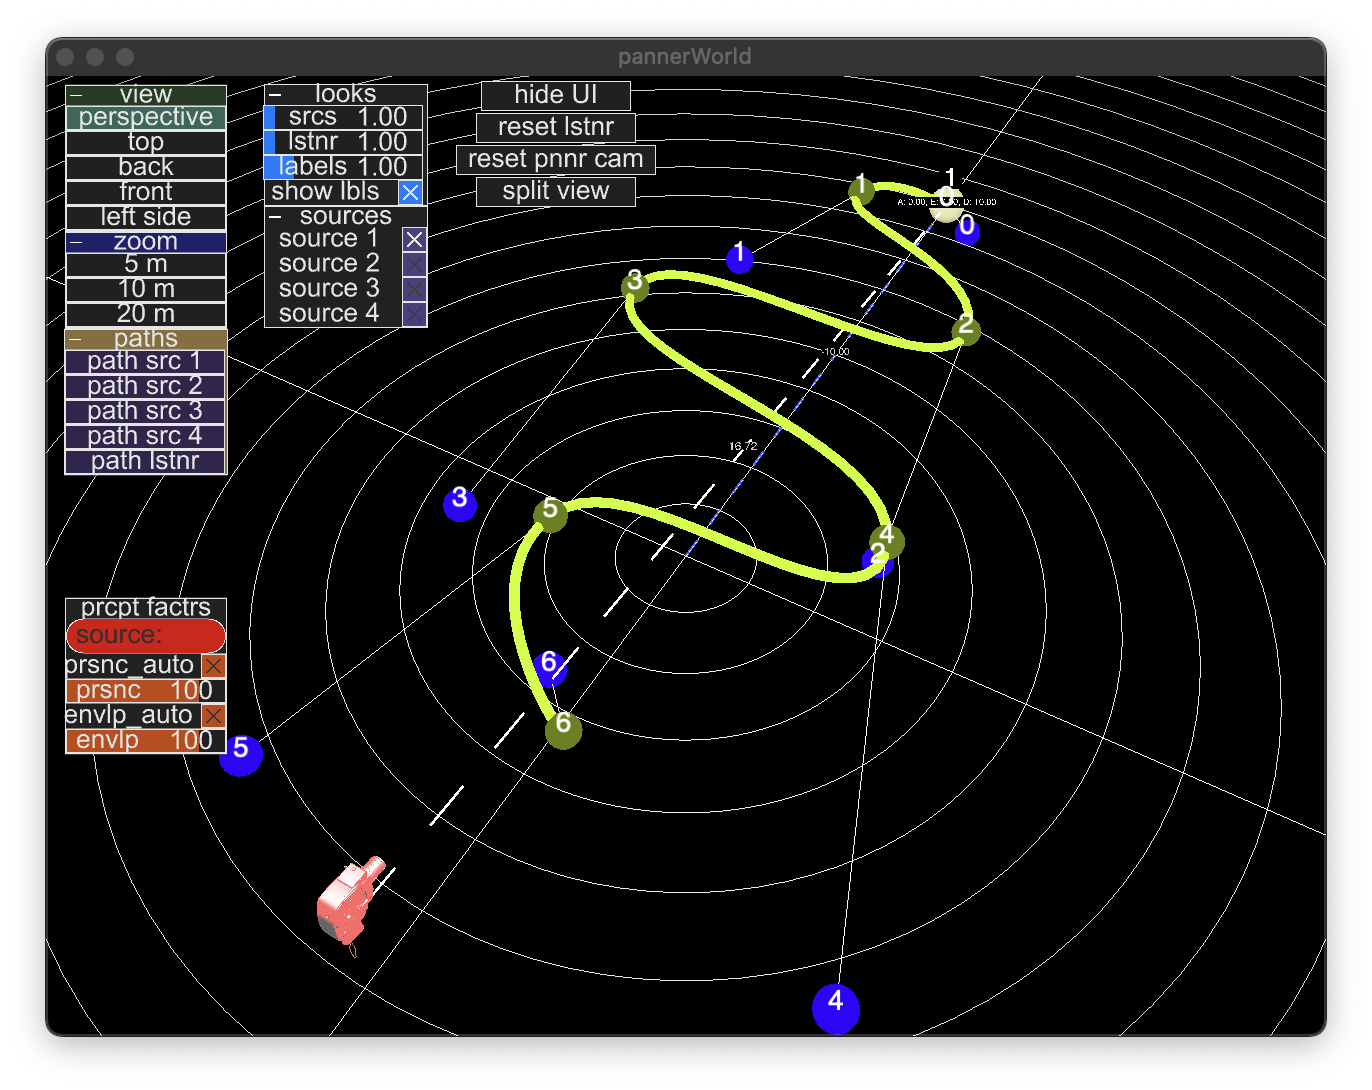
Above is a path as shown in the 3D panner. It is composed of seven points (from 0 to 6) shown in dark green, each of those being linked to a handle, represented as a blue sphere, allowing to change the curve of the adjacent segments. This is the path for the performer 1, represented as a sphere at the position of the point 0. Each performer and the camera have their own dedicated path color.
Available interactions are:
- Buttons in the “path” menu: open the Path creator window for each element
clickon a point or handle: make the coordinates of that point/handle to appear in the Path creator windowclick + dragon a point/handle: move the point/handle in space, along a plane perpendicular to the camera. So just like for the sources/performers, the degrees of freedom will depend on the point of view. For example, use the Top view if you only want to move the points/handles horizontally while retaining their height (Y position).option + click + dragon a point/handle: move the point/handle in space in the perpendicular direction of the positioning plane, i.e. closer or further away from the camera. For example if you’re in the top view, hold Option to move the point/handle up/down (along the Y axis)command + click + dragon a point: move the entire pathdouble-clickon the path: insert a point at the clicked locationshift + double-clickon a point: delete the point
More editing options are available in the Path creator window
Path Creator window
Section titled “Path Creator window”All objects that can be moved along paths (each performer+platform ensemble, the camera) have their own Path Creator window, bringing controls to edit and manage paths, as well as defining how they interact with presets.
These windows can be opened either from the “Path Creator” button you’ll find in the Stage’s Camera and Performer modules, or through the paths menu in the 3D panner.
The window is divided into three parts:
- Animation with everything needed to play a path in various ways
- **Save / restore ** to read and write paths to/from the disk
- Edition to hide/show the path in the Panner, change the path behavior and edit points and handles
Everything in the Edition section is stored in the path JSON file, while all the rest (main on/off button and every brown parameter: loaded JSON file and Animation parameters) are stored in presets.
First, in order for a path to be edited in the 3D panner or played back, its corresponding Path Creator window must be turned on.
Turn it off when paths aren’t in use for that object.
-
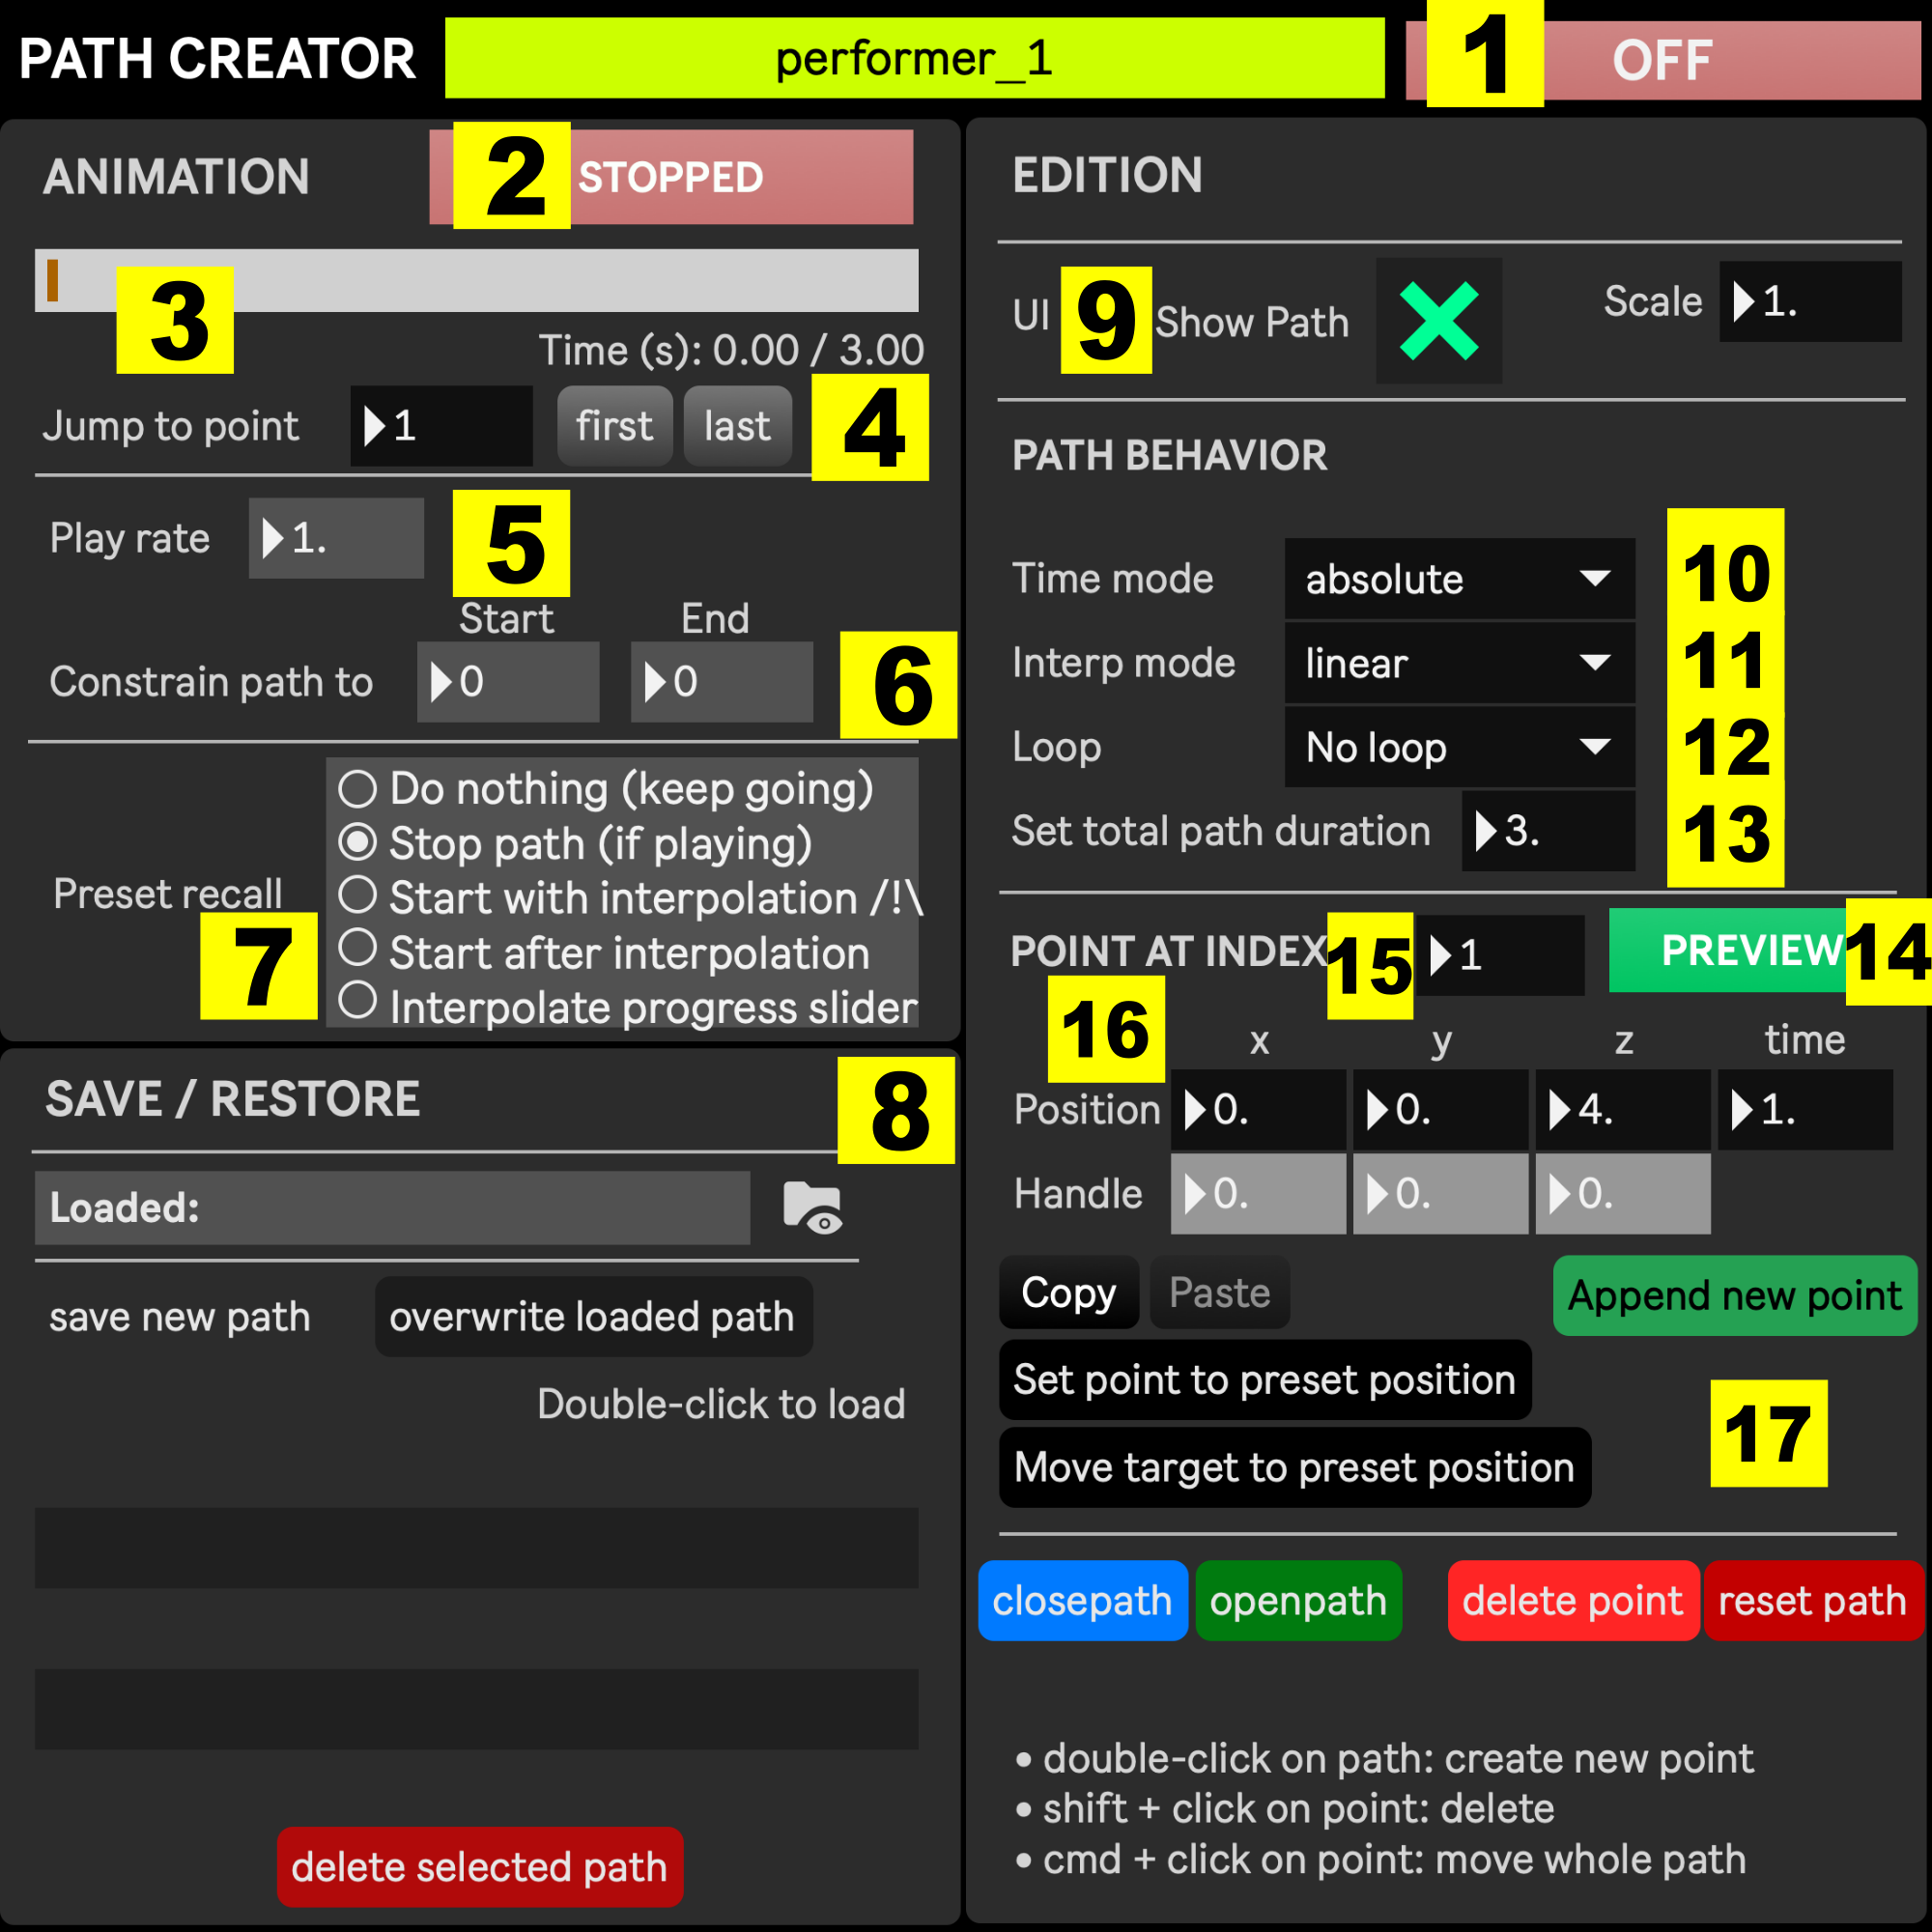
Enable: turns the path on/off. In order to be edited in the 3D panner or played back, this must be turned on. Turn it off when paths aren’t in use for that object.
-
Play (either “Playing” or “Stopped”): starts/stops playing the path. In order to determine how this button is turned on/off with presets, see the Preset recall parameter below
-
Progress bar: shows the progress of the animation. The progress bar can be scrolled manually using the mouse or a bound MIDI controller if assigned to a macro. It moves automatically when a path is playing, or when a preset interpolation is ongoing while the Preset recall parameter is set to “Interpolate preset slider”. The displayed time below it takes into account the total path duration and its play rate.
-
Jump to point: instead of scrolling through the path continuously, you can jump to a desired point using these commands. This is only for control purpose and is not saved in presets
-
Play rate: the speed at which the path is played. This works in conjunction with the time value of each point if Time mode is set to Relative, or with the Total path duration if Time mode is set to Absolute
-
Path_start and path_stop (constrain path to): allow to constrain the path to be played only between two of its points. The End point must be higher than the Start point. If you want to play the segment backward, use a negative play rate. Set both start and end to 0 to ignore the constraint and play the path in its entirety.
-
Preset recall: this dictates the way a path plays or stops with presets and preset interpolation. For more information about ways to position and move objects with these settings, see Positioning and movement strategies.
- Do nothing: if a preset gets recalled with the same path, that path will retain its previous playing/stopped state upon preset recall. This is useful for example when you have a path playing in loop, and you want to recall a preset for changing other parameters while keeping the path playing.
- Stop path: will stop the path immediately at preset recall or at the beginning of a preset interpolation
- Start with interpolation: the loaded path will start playing immediately at the beginning of the preset interpolation. This allows to make a path to start playing while possibly interpolating parameters other than the object position.
- Start after interpolation: the loaded path will start playing only when the interpolation has ended. This allows to interpolate the objects position and make the path to automatically start playing at the end of the interpolation.
- Interpolate progress slider: preset interpolation will make the path stop playing, but animation along the path will still occur according to the change in position of the progress slider saved in the interpolating presets. This allows to animate a path between two arbitrary points in the progression bar (not necessarily actual points of the path), and to make that animation to last the same duration as the interpolation time, regardless of the paths rate, duration and time mode. When NOT in “interpolate progress slider” mode, the progress slider position is simply ignored (not recalled with presets).
-
Save / Restore: at the bottom, paths found in
/stage/paths will be automatically added. Double click on one of the listed paths to load it. Recalling a preset with a saved path will make that path to be loaded if it isn’t already. After editing a path, you can save it either by overwriting the currently loaded path (that you just modified), or save it as a new path. When selecting the last option, a dialog will appear, asking for a name for the new path. Notice that all Path Creator windows will list all paths of the project, meaning for example that a path saved in the performer 1 Path Creator window will also be available for the Camera. -
UI show and scale. The Show path toggle with hide/show the path in the 3D panner if that Path creator is enabled. The scale will make the tube representing the path and points and handles wider/narrower. This has no impact on the way the path behaves.
-
Time mode: defines the way the time value associated to each point is interpreted
- Absolute: the time value of each point defines the time at which the animation should reach those points. In this mode, point 0 will always have a time value of 0, last point a time value of the total path duration and each point in-between a an increasing time value, between 0 and the total path duration
- Relative: the time value of each point defines the time to reach that point from the previous point. If all points have a time value of 1, it would take 1 second to go from one point to the next point (given that the play rate is at 1.), no matter what the distance is between those two points.
-
Interp mode: defines the way points are connected:
- Linear: points are connected with straight lines
- Spline: points are connected with Bézier curves that can be shaped with the handle available for each point
-
Loop:
- No loop: the path plays once and stop
- Loop: the path plays indefinitely in a loop (the object will be “teleported” to point 0 after reaching the last point if those two points are not connected - this can changed with the
closepathandopenpathcommands) - Palindrome: the path play direction changes every time the first or last point is reached. Useful for back and forth movements
-
Set total path duration: will automatically set the time value of all points while respecting the time mode. For example, given a path of 6 points in absolute mode, setting total path duration to 10s will result in the following time point values: 0 2 4 6 8 10. In relative mode, the time values will be: 0 2 2 2 2 2.
-
Preview: when enabled, selecting a point by clicking it will automatically make the object go to that point. Editing the point will result in the object to move to the new position. Useful for precisely placing a point while watching the result in the TT render window. To use this feature, the path should not be playing.
-
Point index: shows the selected point index. Can be set manually by entering the point index, or by clicking the point in the 3D panner.
-
Point and handle coordinates values
- X-Y-Z coordinates and time value of the selected point. See Time mode and Set total path duration for more info about the time value
- X-Y-Z coordinates of the handle associated with the selected point (relevant only if Interp mode is set to spline)
-
Various commands to facilitate path edition:
- Copy / Paste: allow to copy the coordinates and time values of a given point and its handle and past them at another point. Useful as a temporary memory for testing various points positions without fearing of losing the initial value, or when swapping points
- Append new point: add a new point at the end of the path at position (0, 0, 0). Will change the total path duration
- Set point to preset position: moves the currently selected point to the objects position stored in the currently recalled scenic/performer preset. Useful to align the start or end point of a path to the objects position stored in a preset.
- Move target to preset position: moves the object to the position stored in the currently recalled scenic/performer preset. Useful to use before overwriting a preset without losing the saved position. Editing a path with the Preview enabled makes the objects position to necessarily change. This button just resets the objects position to the stored value in the current preset. The path must not be playing for this command to be used.
- Closepath: if a path draws an open shape, this command will append a new point at the same position as the first point, transforming the path into a closed shape
- Openpath: if the path is a closed shape (with first and last points at the same position), this command will open the path by deleting the last point
- Delete point: deletes the currently selected point. Might alter the total path duration
- Reset path: reset the path to a default 4 points, square-shaped path. Useful to start a new path “from scratch”.