MIDI control
Most parts of the Visual Stage app can be driven by a MIDI controller, and for this a streamlined process has been imagined for maximum flexibility with a limited set of controls, all contained in the Mixer. Although any kind of controller can technically be mapped to some extent, the advised hardware to benefit from all the MIDI features is to have a (set of) controller(s) with 8 faders, 16 + 1 infinite knobs and 6 + 1 buttons.
Faders will control the Mixer faders, the 16 knobs will control each 16 macros available for each track, and 6 buttons will be used to select tracks, and bank through all of the 24 mixer tracks. The +1 knob and button will be used to enable/disable the Presets grid and scroll through its scenes.
Note about track banks: MIDI controllers often have less than 24 faders available. So in order to be able to reach all 24 tracks, they can be banked. For example, if the MIDI controller has 8 faders, the 24 tracks will be divided in 3 banks, accessible by using the mappable bank selection buttons. Some controllers have a builtin bank feature but we decided to handle this on the software side to allow compatibility with more controllers. If the user wants to rely on the builtin bank feature of their controller, then the number of MIDI faders in the MIDI mapping settings will have to be set to 24.
How to create new mappings
Section titled “How to create new mappings”Before starting to map your controller, it is recommended to become familiar with the MIDI mapping section of the Setup layout.
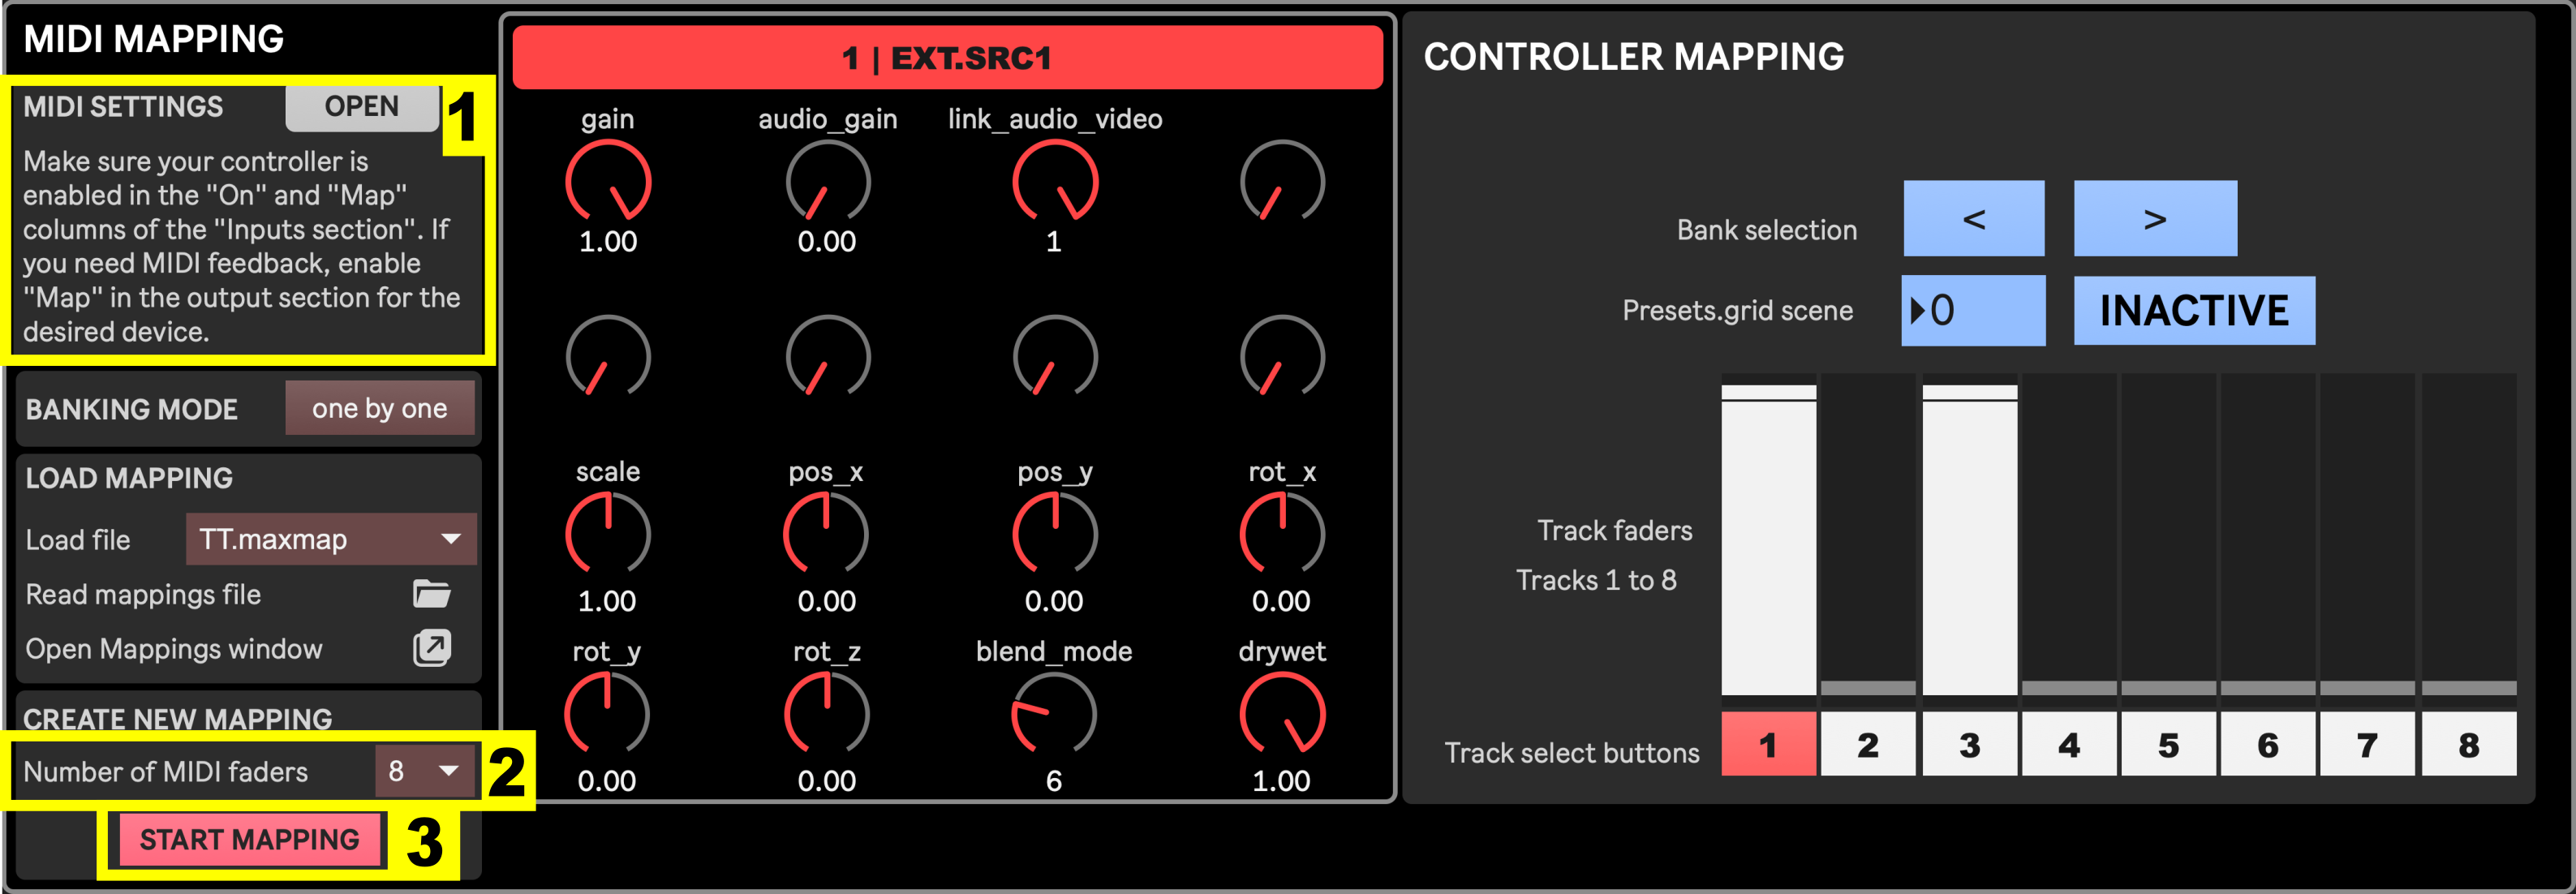
- Open the MIDI setup window, and make sure the MIDI device(s) you want to use are listed and that both the On and Map columns are enabled for them in the Inputs section. If your devices have feedback possibility (motorized faders, endless encoders with LED), enable them in the Outputs section as well so they can receive data when values are changed from within the app.
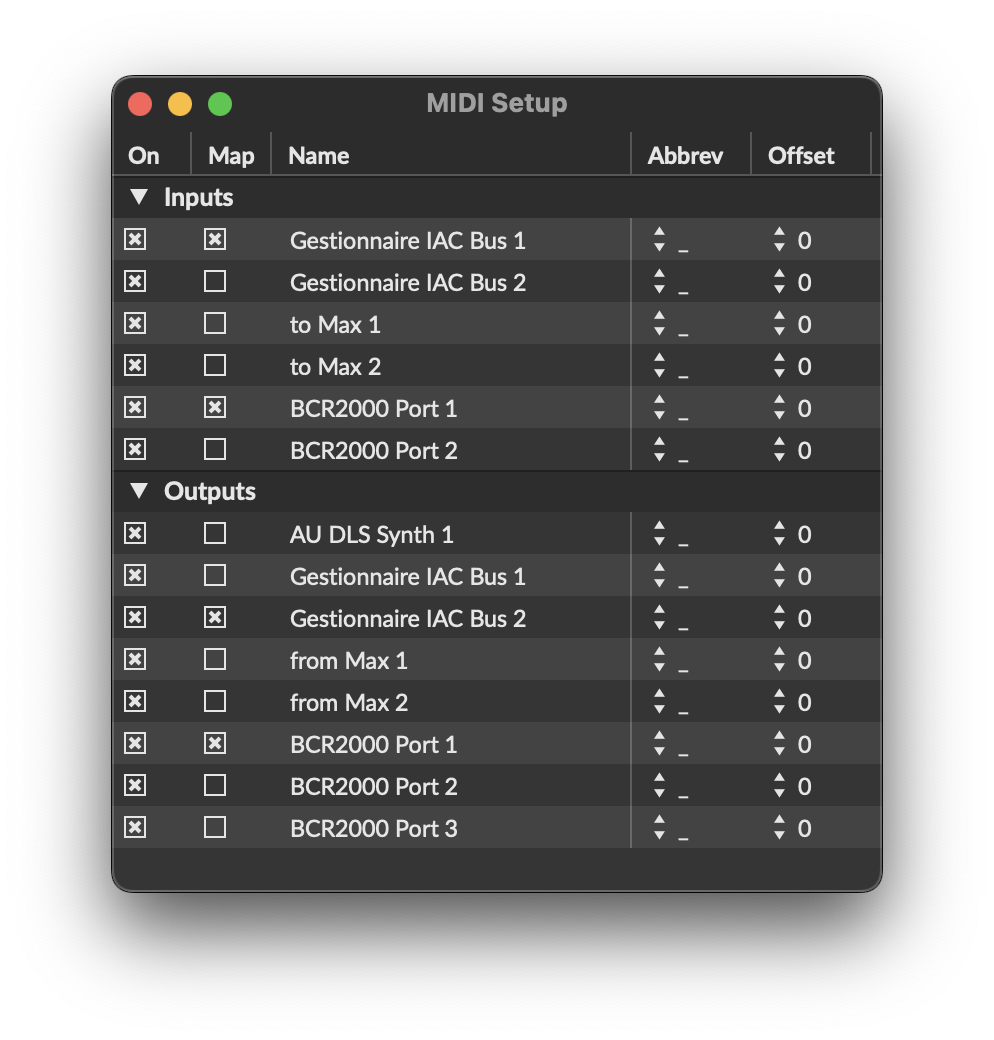
Here the BCR2000 has been properly enabled to send and receive MIDI and port 1. Virtual devices IAC Bus 1 and Bus 2 have also been enabled as input and output respectively in order to use a virtual MIDI controller, for which different ports need to be used for input and output in order to avoid feedback loops. But this shouldn’t be a problem for hardware controllers. Close the window once you are done. - If you want to start from a blank state, select “none” in the Load Mapping file menu. Then Select the number of faders available on your controller. Although 8 is prefered (since the Mixer layout shows 8 tracks at a time), other choices are possible. After selecting a number, the same number of faders will appear on the right.
- Click “Start mapping” to begin the mapping process. The screen will change its appearance:
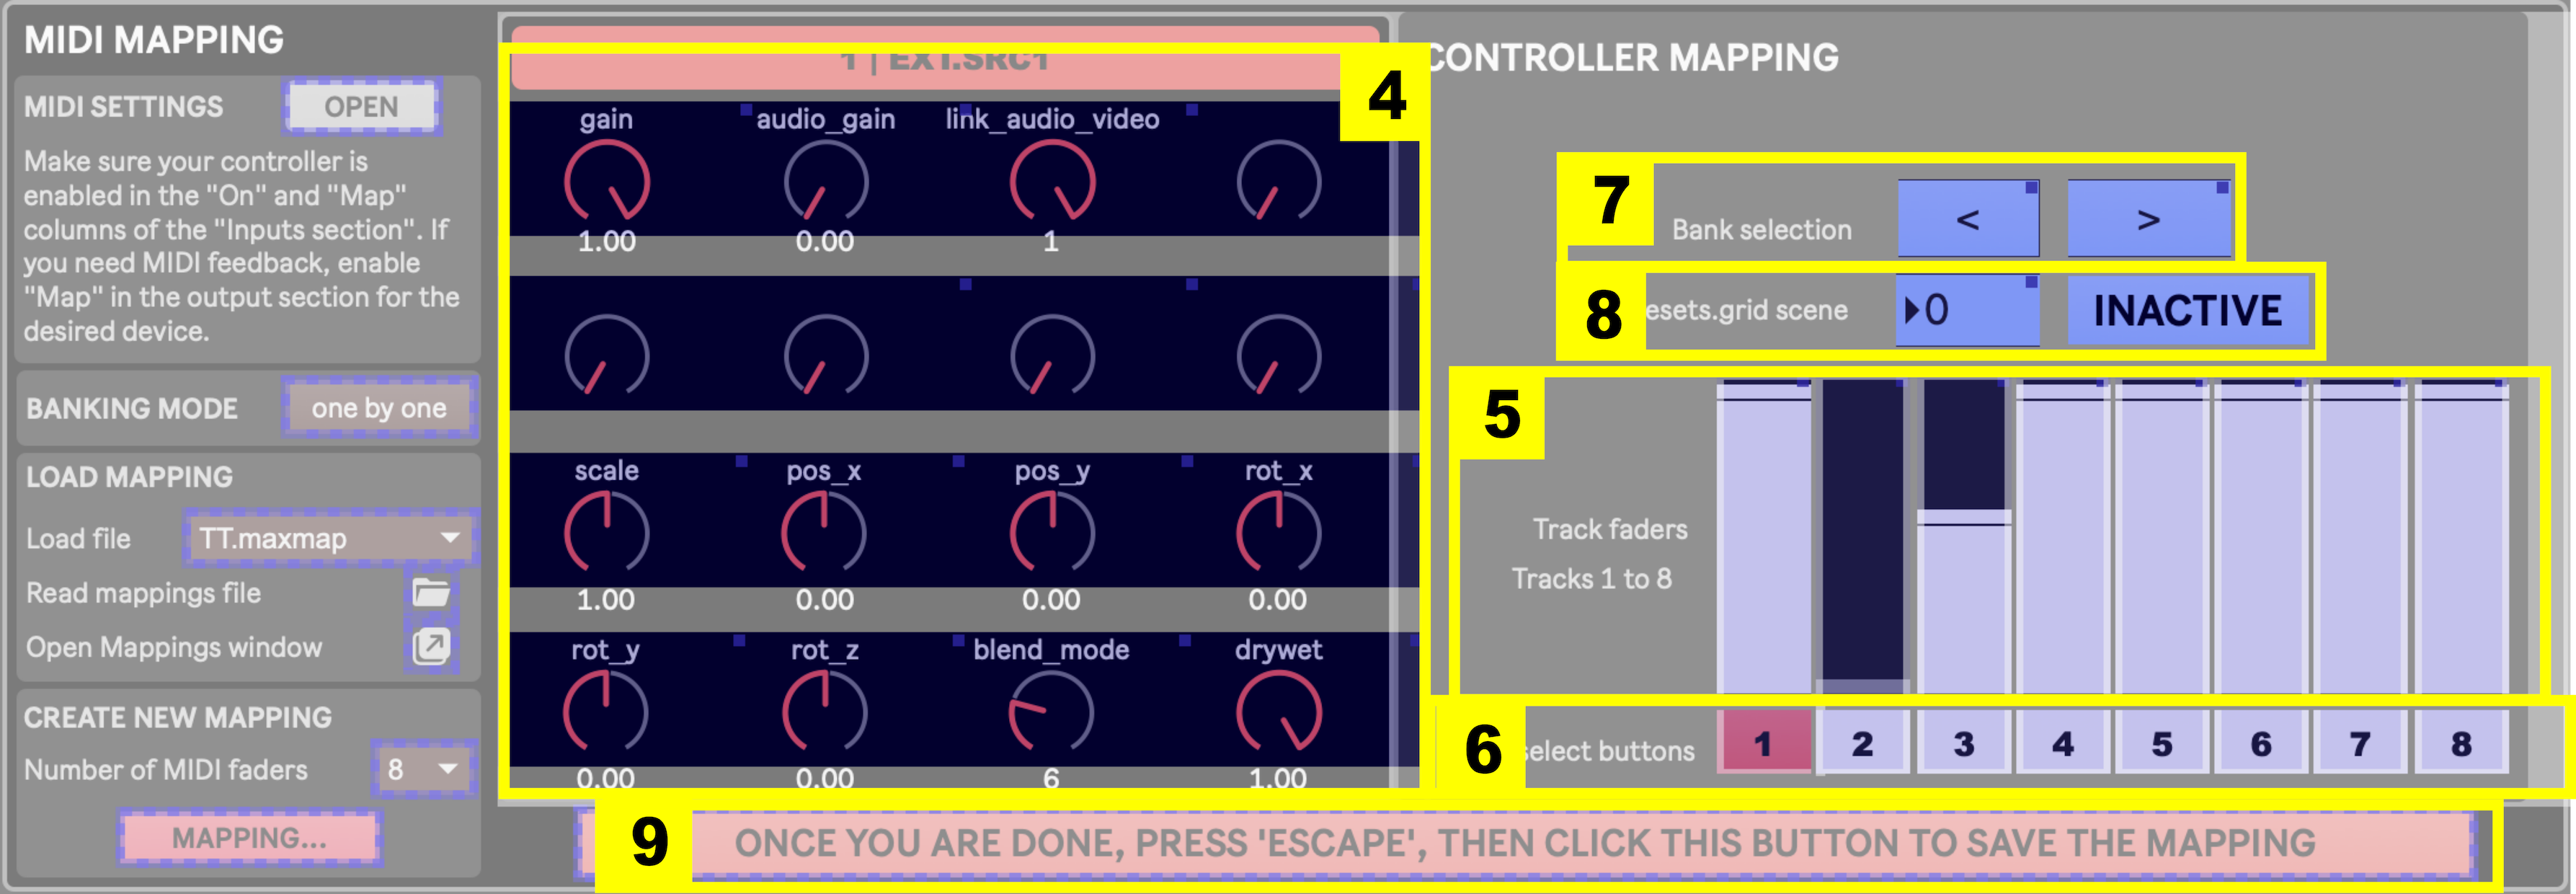
- Although there is no specific order, you can start mapping the Virtual control knobs, will control the macros of any selected track. To do so, click on one knob to select it, turn the related physical knob to map to it, and repeat the process for other knobs.
- Then you can map the faders. Similarly to the knobs, select one, move the physical fader, and repeat with the next one.
- Then map the track selection buttons
- …and the banking buttons, that will allow you to scroll through the 24 tracks of the mixer. You can either scroll through track one by one, or by the defined number of physical faders, by changing the Banking mode.
- Eventually, you can map a CC to the Presets grid scene, and a button to set the ACTIVE/INACTIVE state of the Presets grid.
- Now that every button is mapped, press escape and click the red button as advised.
- A pop-up window will appear, asking for a name to save the mapping file. The mapping file will be stored at
telematic-theater/MIDI/<filename>.maxmapand thus are common to all projects as long as they are opened on the same computer with the same instance of the Visual Stage app. If you set the same name as an existing mapping, it will be overwritten. - Make sure that your newly created mapping is selected in the Load Mapping file menu. Then update the desired Setup preset to save that change. THe choice of a MIDI mapping file is stored in Setup presets, allowing to easily switch between different mappings/devices alongside different Setup presets corresponding to different production phases.
MIDI Interfaces with motorized faders or touch-enabled controls
Section titled “MIDI Interfaces with motorized faders or touch-enabled controls”The way the Max mapping feature works is that it reminds the last received MIDI message as the one to map to the selected virtual control. MIDI controllers with motorized faders frequently have a “touch” feature, sending notes on/off when a fader gets (un)touched, which can mess with our mapping. In order to get the actual fader messages mapped to our virtual fader instead of the touch messages, you need to:
- select the virtual fader you want to map
- slightly move the hardware fader to map, and keep your finger on it
- select the next virtual fader by clicking on it
- move your finger to the next physical fader and slightly move it
- repeat for all faders
- once you reach the last fader, you need to press the ESC button while keeping your finger on the last fader. Once ESC has been pressed and the mapping mode isn’t active anymore, you can remove your finger, and click the red message to save the mapping.